


Views: 0 Author: Site Editor Publish Time: 2026-11-11 Origin: Site


A motorcycle's braking system dictates both rider safety and overall vehicle performance. You trust your brakes to stop you safely, but many riders unknowingly compromise this system by neglecting routine wear. Ignoring brake degradation actively damages your rotors, severely compromises your safety on the road, and inevitably leads to significantly higher repair costs down the line. A proactive approach prevents catastrophic failures and ensures your bike performs exactly as intended.
The objective of this guide is to provide a clear diagnostic framework for identifying common issues with your braking system. We will evaluate specific replacement criteria, helping you understand exactly when parts fail. Finally, we will outline the proper replacement methodology and the essential bedding-in process to guarantee optimal stopping power from day one.
Brake noises act as an early warning system. You must differentiate between a temporary moisture squeak and a severe mechanical issue. A high-pitched squeak often happens on cold, damp mornings. It usually disappears after a few stops once the friction material warms up. However, persistent squealing demands immediate attention.
If you hear a harsh, metal-on-metal grinding noise, you have a severe problem. This sound indicates a fully depleted friction surface. The bare metal backing plate is actively gouging your brake rotor. Some brake systems also feature built-in mechanical wear indicators. These small metal tabs deliberately scrape the rotor when the material gets too thin. If you hear this distinct scraping sound, you need replacements immediately.
Brake fade occurs when you squeeze the lever hard, but the bike refuses to slow down efficiently. This symptom frequently points to a phenomenon known as "glazing." Glazing happens when extreme heat hardens the pad's surface. The hardened material loses its necessary friction, causing it to slip against the rotor instead of gripping it.
Poor riding habits heavily accelerate glazing. Dragging the brakes—resting your foot on the rear pedal or holding the front lever lightly while accelerating—builds continuous friction heat. Over time, this bakes the friction compound. Once glazed, the surface becomes shiny and brittle. You cannot reverse this chemical change, making replacement the only viable solution.
The feedback you feel at the brake lever tells a detailed story about the system's health. You must learn to distinguish between two completely different lever symptoms to diagnose the root cause accurately:
When you inspect the caliper, you might notice one side wearing out significantly faster than the other. Many riders mistakenly blame a defective part for this issue. However, uneven wear almost always signals a mechanical failure within the caliper assembly itself.
A sticking caliper piston usually causes this uneven degradation. If the piston fails to retract properly, it forces one side to drag constantly against the rotor. Unlubricated or seized slider pins create the exact same issue. The caliper fails to float, putting all the braking stress on a single side. You must fix the caliper movement before installing new replacements, or the uneven wear will immediately repeat.
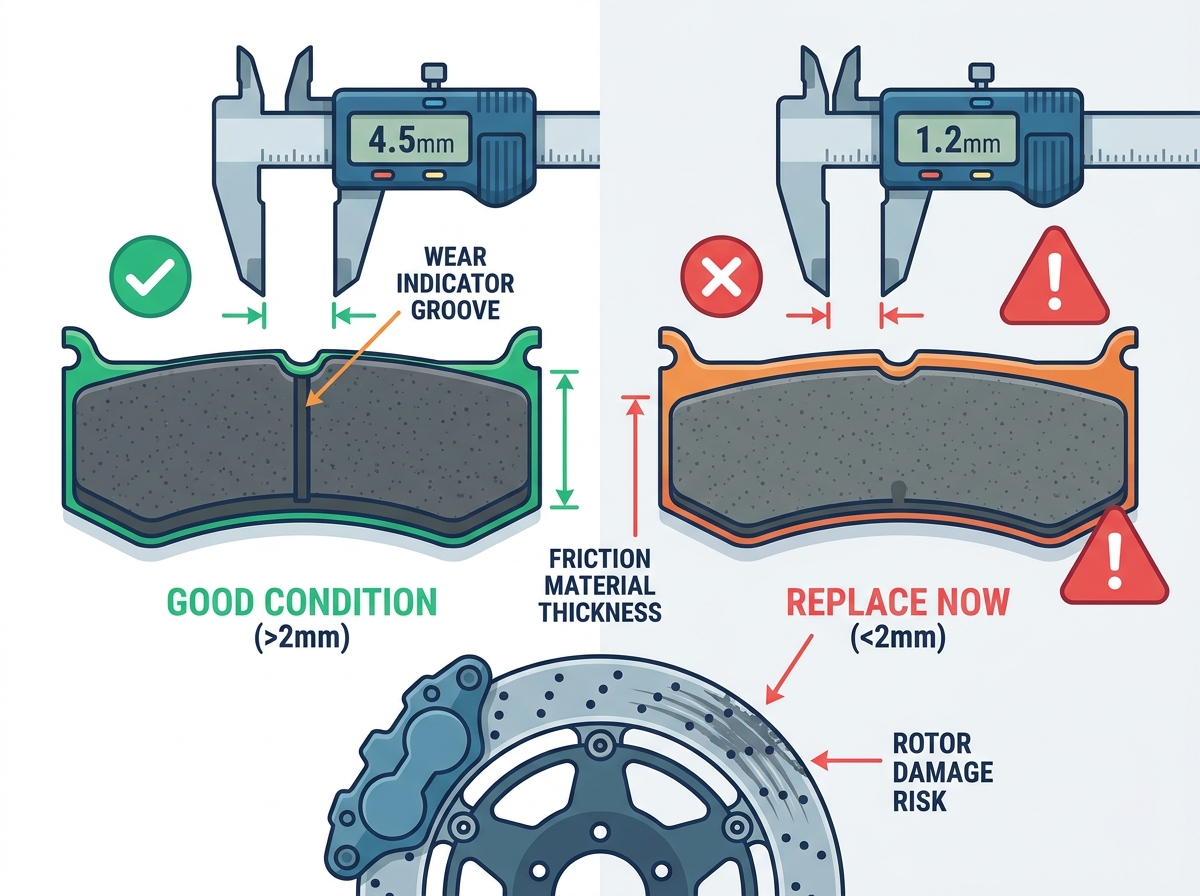
Visual inspection provides the most reliable way to evaluate wear limits. You should routinely check the wear grooves cut into the friction material. Industry standards provide an objective evaluation metric: replace them when the material drops below 2mm. If the wear grooves completely disappear, or the material sits flush with the wear indicator, replacement becomes non-negotiable.
When you evaluate a Brake Pad for Lifan, never attempt to maximize its lifespan by running it below 2mm. The thinner the material gets, the less heat it can dissipate. This rapid heat transfer boils the brake fluid, leading to sudden and catastrophic brake failure.
Motorcycle brakes operate in exposed environments. They frequently encounter fork oil leaks, spilled brake fluid, and heavy road grease. If porous friction material absorbs any of these chemical fluids, it becomes permanently compromised.
You cannot effectively clean or "repair" a soaked component. Solvents and brake cleaners only remove surface oils; they do not penetrate the porous compound. As soon as the brakes heat up during a ride, the trapped oils seep back to the surface. This causes dangerous, unpredictable slipping. Replacement stands as the only safe and accepted standard for contaminated parts.
A damaged braking surface does more than just make noise; it physically ruins the brake rotor. You must assess whether a depleted or glazed part has scored the metal rotor. Run your fingernail across the rotor surface. If your nail catches on deep grooves, the rotor requires resurfacing or outright replacement.
Installing new parts onto a deeply grooved rotor wastes your money. The flat new surface will only contact the high peaks of the damaged rotor. This drastically reduces the contact area, resulting in dangerously weak stopping power. It also causes the new material to wear out prematurely as it grinds against the sharp ridges.
Table: Repair vs. Replace Diagnostics
| Observed Symptom | Underlying Cause | Required Action |
|---|---|---|
| Material thickness under 2mm | Normal end-of-life wear | Replace immediately |
| Fluid-soaked surface | Fork seal or caliper leak | Fix leak, replace pads |
| Deep rotor grooves | Metal-on-metal grinding | Replace rotor and pads |
| Shiny, hardened surface | Overheating (Glazing) | Replace pads |
Selecting the correct friction material dictates how your motorcycle handles specific riding conditions. You generally choose between three primary compound types:
When selecting a Brake Pad for Lifan, you must weigh OEM reliability against aftermarket options. OEM components provide guaranteed baseline reliability and exact fitment. However, high-tier aftermarket brands often offer specialized compounds tailored to specific riding styles, like heavy off-roading or track use.
Establish strict selection criteria before buying. Look for ISO manufacturing standards or DOT safety compliance on the packaging. Demand transparent material specifications so you know exactly what compound you are installing. Finally, verify exact model fitment by comparing the backing plate dimensions against your original equipment.
The online marketplace floods consumers with unusually cheap, unbranded replacement parts. We strongly advise against purchasing these components from unverified third-party marketplaces. Counterfeit manufacturers frequently use substandard bonding agents and unpredictable friction compounds.
Braking serves as a critical life-safety function. Cutting corners here introduces extreme risk. A counterfeit backing plate can snap under heavy pressure, or the friction material can completely delaminate from the plate at high speeds. Always source parts from reputable dealers who specialize in verifiable motorcycle components.
Proper installation requires much more than simply swapping out parts. Before you install a new Brake Pad for Lifan, you must prep the caliper assembly. As old materials wear down, the caliper pistons extend further outward, accumulating brake dust and road grime on their exposed sides.
You must clean the caliper pistons thoroughly with a dedicated brake cleaner. Do this before pushing them back into the housing to accommodate the thicker new parts. Pushing dirty pistons inward drags abrasive grime past the delicate hydraulic seals, causing immediate fluid leaks. Additionally, mandate the cleaning and lubrication of caliper slider pins using high-temperature silicone grease. This ensures the caliper floats freely.
A common complaint after an installation is that "the new brakes squeak or feel incredibly weak." This issue almost entirely stems from skipping the bedding-in process. Bedding-in aligns the microscopic surfaces of the new compound with the rotor and transfers a thin, even layer of friction material onto the metal disc.
Follow this structured framework to properly bed in your components:
We strongly warn against heavy, emergency braking immediately after installation. High-speed panic stops shock the fresh material with extreme heat, causing instant glazing and ruining the installation.
Preventative maintenance saves time and ensures consistent safety. We recommend establishing a strict visual inspection cadence. Check the material thickness and rotor condition every 1,000 miles. A great habit involves inspecting the braking system during every routine oil change or chain lubrication session.
Catching uneven wear early allows you to clean a sticky caliper before it destroys a fresh set of components. Use a flashlight to peek down into the caliper housing to confirm that both sides wear evenly.
The environment you ride in drastically affects component longevity. Corrosive elements heavily accelerate abrasion. If you ride through thick mud, salted winter roads, or heavy urban grit, you must prioritize cleaning.
Advise rinsing the brake assemblies with fresh water after riding in these harsh environments. Removing trapped dirt and salt prevents premature abrasion on the rotors and stops the caliper slider pins from seizing up due to rust.
Mechanical parts do not operate in isolation. Optimal performance relies heavily on healthy brake fluid. Brake fluid is hygroscopic, meaning it actively absorbs moisture from the air over time. This moisture lowers the fluid's boiling point and causes internal corrosion.
You must flush the hydraulic fluid every one to two years. Degraded fluid prevents proper caliper pressure, leading to the spongy lever feel we discussed earlier. Furthermore, old fluid can prevent pistons from retracting smoothly, which drags the components against the rotor and burns them out prematurely.
Maintaining your braking system requires a diagnostic baseline built on awareness. You must listen to your brakes for abnormal grinding, consistently monitor the physical thickness, and never ignore sudden changes in lever feedback. Addressing these symptoms early prevents minor wear from escalating into expensive rotor damage.
Remember that selecting the right replacement parts depends heavily on matching the material to your specific use case. Whether you choose organic compounds for quiet urban commutes or sintered options for aggressive riding, match the technology to your environment.
Take actionable steps today. Physically inspect your motorcycle's brake assembly right now to check the wear grooves. If you spot critical wear but lack the proper tools or confidence for safe installation, schedule a consultation with a certified technician immediately.
A: A typical lifespan ranges between 5,000 and 15,000 miles. This heavily depends on the friction material and your riding style. Organic materials wear faster in stop-and-go city traffic. Sintered materials generally last longer. Aggressive braking or carrying heavy loads will push longevity toward the lower end of that spectrum.
A: Squeaking on new installations usually happens because you skipped the bedding-in process. It can also occur due to incompatible rotor surfaces or a lack of anti-squeal paste on the metal backing plate. Clean the rotor thoroughly and perform controlled stops to bed them in properly.
A: No. You must always replace them as a complete set per caliper. Replacing just one side creates imbalanced friction. This leads to uneven braking force, pulling, and dangerous handling under heavy stops. Always buy and install them in matched pairs.
A: It depends on your priorities. Sintered options offer superior wet weather performance and heat dissipation. However, organic components often provide a smoother, quieter initial bite at low urban speeds. If you prioritize quiet stops in dry city environments, organic might serve you better.


