


Views: 0 Author: Site Editor Publish Time: 2026-11-02 Origin: Site


Brake responsiveness serves as the ultimate baseline for rider safety. Every time you squeeze the lever, you expect immediate and predictable stopping power. When a Lifan motorcycle or scooter develops spongy levers or delayed reaction times, the mechanical linkage is usually the primary suspect. You cannot afford to ignore these early warning signs.
Daily commuter and utility vehicles endure intense mechanical wear and harsh environmental exposure. Progressive cable degradation happens silently over months of riding. This wear heavily compromises your stopping distance long before you realize a severe problem exists. You must monitor this deterioration to maintain safe operation.
This guide provides a structured framework to diagnose mechanical faults accurately. We will help you evaluate replacement options and execute a safe, standards-compliant installation. You will learn exactly how to restore factory-level braking performance to your motorcycle.
Riders often misdiagnose brake fade as worn brake pads. The root cause frequently lies in cable friction or excessive mechanical stretch. Proper diagnosis saves you time and prevents unnecessary parts swapping. You must evaluate the physical linkage before disassembling the wheel hub.
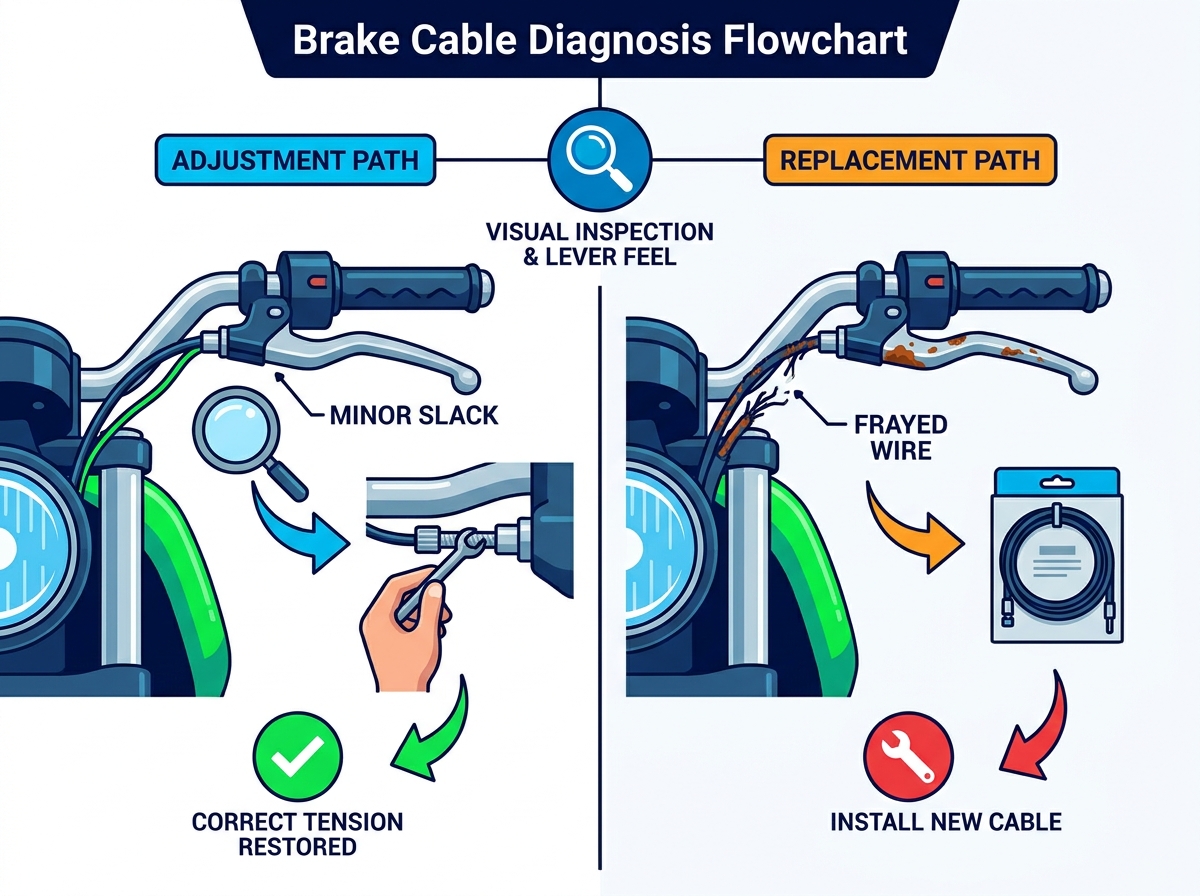
Visual inspection provides immediate clues regarding system health. You should routinely check specific high-stress zones. The lever anchor point represents the most common failure location. Wire strands bend sharply here during every braking cycle. You must also inspect the outer housing. Look for visible cracks, sharp kinks, or signs of moisture ingress. A cracked outer sheath allows water to destroy the inner wire rapidly.
Tactile assessment helps you understand internal component health. Lever feel communicates exactly what happens inside the housing. Use these diagnostic metrics:
You must establish a strict decision threshold for component replacement. Adjust the handlebar barrel adjuster to remove slack. If adjusting this barrel fails to restore proper tension, replace the unit immediately. Additionally, if you see any frayed wire strands near the lever, replacement becomes mandatory. Do not attempt to repair frayed strands.
Table: Brake Response Diagnostic Matrix
| Symptom | Primary Cause | Recommended Action |
|---|---|---|
| Spongy Lever Feel | Wire stretch or housing compression | Adjust tension; replace if maxed out |
| Binding / Sticking | Internal rust or severe dirt ingress | Lubricate; replace if friction remains |
| Visible Wire Fraying | Metal fatigue at anchor point | Immediate replacement mandatory |
| Lever Snaps to Grip | Severed inner wire | Immediate replacement mandatory |
Environmental realities heavily dictate the lifespan of mechanical linkages. Motorcycles operate outdoors, exposing critical components to severe weather and dirt. Understanding these degradation factors helps you implement better preventative maintenance.
Moisture and oxidation destroy standard steel components rapidly. Riding in heavy rain forces water into the housing openings. Improper outdoor storage accelerates this issue. Water strips away the factory lubrication layer. Capillary action pulls this moisture deep into the housing. Internal rust forms quickly, especially in unlined budget components. As rust expands, it creates massive friction against the inner sheath.
Incorrect routing represents another major cause of premature failure. Aftermarket modifications often disrupt factory wiring paths. Previous improper installations might create tight pinch points. Sharp bends increase friction exponentially. They force the inner wire to scrape violently against the outer sheath. This friction grinds away the protective layers and accelerates metal fatigue. The steering column area remains highly susceptible to these routing errors.
Thermal and mechanical stress also degrade these parts constantly. Stop-and-go commuting demands hundreds of lever pulls daily. This repetition pushes standard carbon steel beyond its fatigue limits. The constant tensioning and releasing cause micro-fractures in individual wire strands. Over time, the tensile strength drops significantly. The wire eventually stretches under normal braking loads, causing a spongy lever feel before eventually snapping.
Navigating the replacement parts market requires careful consideration. You face a choice between OEM Lifan replacements and various aftermarket upgrades. Both categories offer distinct advantages, but you must prioritize material quality and exact fitment. An ill-fitting component poses severe safety risks.
When selecting a Brake Cable for Lifan, you must evaluate three key dimensions carefully. Material composition dictates lifespan. Stainless steel inner wires resist corrosion far better than galvanized steel. Galvanized options cost less initially but rust quickly once their zinc coating wears away. Stainless steel ensures consistent performance even in humid environments.
Housing specifications matter just as much as the inner wire. Prioritize units featuring a PTFE (Teflon) internal liner. This slick liner reduces friction dramatically. It eliminates the need for heavy, wet lubricants. Wet oils often attract dust and grit, which forms an abrasive paste inside the housing. A PTFE liner allows smooth, dry operation.
Fitment accuracy determines system safety and ease of installation. Universal components frequently fail in the real world. They often feature incorrect barrel sizes. Mismatched lengths create routing nightmares and dangerous pinch points. An inner wire that measures just ten millimeters too long will prevent proper brake engagement. You cannot calibrate out a severe length discrepancy.
We must emphasize transparency regarding aftermarket parts. Premium aftermarket options often feature superior stainless steel and Teflon materials. However, you must verify the exact overall length and terminal types against your specific Lifan model. Whether you ride a KP150, an LF200, or a utility scooter, cross-reference the manufacturer part number. Skipping this verification step creates massive safety liabilities.
Chart: Material and Housing Evaluation
| Specification | Standard Galvanized (Budget) | Premium Stainless & PTFE (Upgrade) |
|---|---|---|
| Inner Wire Material | Galvanized Carbon Steel | Braided Stainless Steel |
| Corrosion Resistance | Low (Prone to rusting) | High (Resists moisture damage) |
| Internal Housing | Unlined PVC | PTFE (Teflon) Lined |
| Lubrication Needs | Requires frequent wet oiling | Self-lubricating / Dry operation |
| Friction Level | Moderate to High | Extremely Low |
Brake systems possess zero margin for error. A flawed installation can cause catastrophic brake failure or unexpected wheel lockup. You must approach this procedure methodically. Rushing the process compromises your personal safety on the road.
Proper preparation ensures a smooth workflow. Gather your tools before disassembling the motorcycle. You need dedicated cable cutters. Standard pliers crush the housing and cause the wire to fray. You will also need a set of metric wrenches. Have appropriate dry lubricant ready if you are installing an unlined unit. Clean your work area to prevent dirt from entering the new housing.
Document the original routing path before you remove anything. Take clear photos of the steering head, frame down-tubes, and caliper mounting points. You must replicate this exact factory path. Proper routing prevents binding when you turn the handlebars. Once documented, loosen the lower adjustment nut fully. Disconnect the wire from the brake drum or caliper arm. Finally, slide the barrel out of the handlebar lever.
Follow this exact installation workflow for maximum safety:
Calibration requires patience and precision. Set the initial baseline tension using the lower adjustment nut at the wheel hub. You want the brake shoes positioned just off the drum surface. Once you establish this baseline, move to the handlebars. Use the upper barrel adjuster to fine-tune the lever feel. Align the slots on the barrel adjuster and lock nut, then tighten the lock nut securely.
You cannot ride the motorcycle immediately after installation. You must verify system integrity through rigorous static testing. Defining success criteria keeps you safe. A successful installation results in a firm lever pull. The wheel must stop decisively. The lever must snap back to its resting position instantly upon release.
Begin with static testing on a center stand. Elevate the front or rear wheel off the ground. Spin the wheel by hand. It must rotate entirely freely without any dragging sounds. Squeeze the lever firmly. The wheel must lock instantly and forcefully. Release the lever, and verify the wheel spins freely once again. Dragging indicates over-tensioning or internal binding.
You must perform a mandatory steering clearance check. Start the engine while keeping the motorcycle on the stand. Turn the handlebars fully to the left lock, then fully to the right lock. Watch the wheel and listen closely. The brakes must not engage during this movement. Engine RPM should not change. If the brakes apply themselves during a turn, your routing is too tight or incorrect.
Prepare for a mandatory bedding-in period. New mechanical linkages always experience minor initial stretch. The braided strands pull tighter together under load. The housing ferrules seat deeper into their brackets. Expect the lever to feel slightly looser after the first 50 to 100 miles of riding. You will need to perform a secondary adjustment using the handlebar barrel adjuster to restore optimal tension.
Mechanical brake reliability relies entirely on the integrity and smooth operation of your linkage system. You must remain vigilant about progressive wear and tear. Spongy levers and frayed strands demand immediate attention rather than delayed maintenance.
When selecting parts, apply strict shortlisting logic. You should always prioritize exact-fit, high-quality materials over the cheapest available options. A stainless steel, PTFE-lined component guarantees reliable stopping power and vastly outlasts standard galvanized alternatives.
Take proactive action today. Go physically inspect your current motorcycle setup right now. Check the anchor points for fraying and test the lever resistance. Match your specific Lifan model parameters accurately. Order a verified replacement component before a total mechanical failure occurs on the road.
A: You should perform a visual inspection and apply light lubrication every 3,000 miles. Lubricate immediately after riding in heavy rain or washing the motorcycle. However, if you upgraded to a PTFE (Teflon) lined housing, avoid using wet oils entirely. Wet oil degrades the Teflon liner and attracts grit.
A: We strongly advise against using universal components. Lifan scooters require precise length measurements and specific terminal ends for safe operation. Universal options often feature incorrect barrel dimensions or excess length, which causes severe routing issues, binding, and potential brake failure. Always purchase model-specific parts.
A: A spongy feel post-installation usually stems from improper seating of the housing ferrules. Ensure all ends sit flush within their designated brackets. It can also result from initial wire stretch. If the linkage is perfect, suspect underlying mechanical issues with worn brake shoes or a deeply grooved brake drum.
A: Industry standards dictate maintaining 10 to 20 millimeters of free travel at the tip of the lever before the brakes engage. This specific metric provides a safe baseline. It prevents the pads from dragging against the drum continuously while ensuring rapid engagement during emergency stopping scenarios.


