


Views: 0 Author: Site Editor Publish Time: 2026-10-30 Origin: Site


Precise brake cable fitment dictates rider safety. It directly controls braking responsiveness on Lifan motorcycles and scooters. When you pull the lever, you expect immediate feedback. Navigating replacement parts often presents a serious challenge for riders. Mismatched lengths or incorrect fittings cause binding inside the housing. They can lead to excess friction, delayed stopping power, or catastrophic failure. This article provides a clear technical evaluation framework. We aim to help you select, verify, and install the right components. You will learn how to decode specifications accurately and avoid common installation errors. We also guide you through verifying proper fitment parameters. You can confidently install a Brake Cable for Lifan using these methods.
Selecting the correct part requires understanding specific physical dimensions. You cannot rely solely on generic model compatibility charts. Manufacturers occasionally change lever designs or routing paths mid-production. Therefore, taking accurate measurements of your existing setup is crucial.
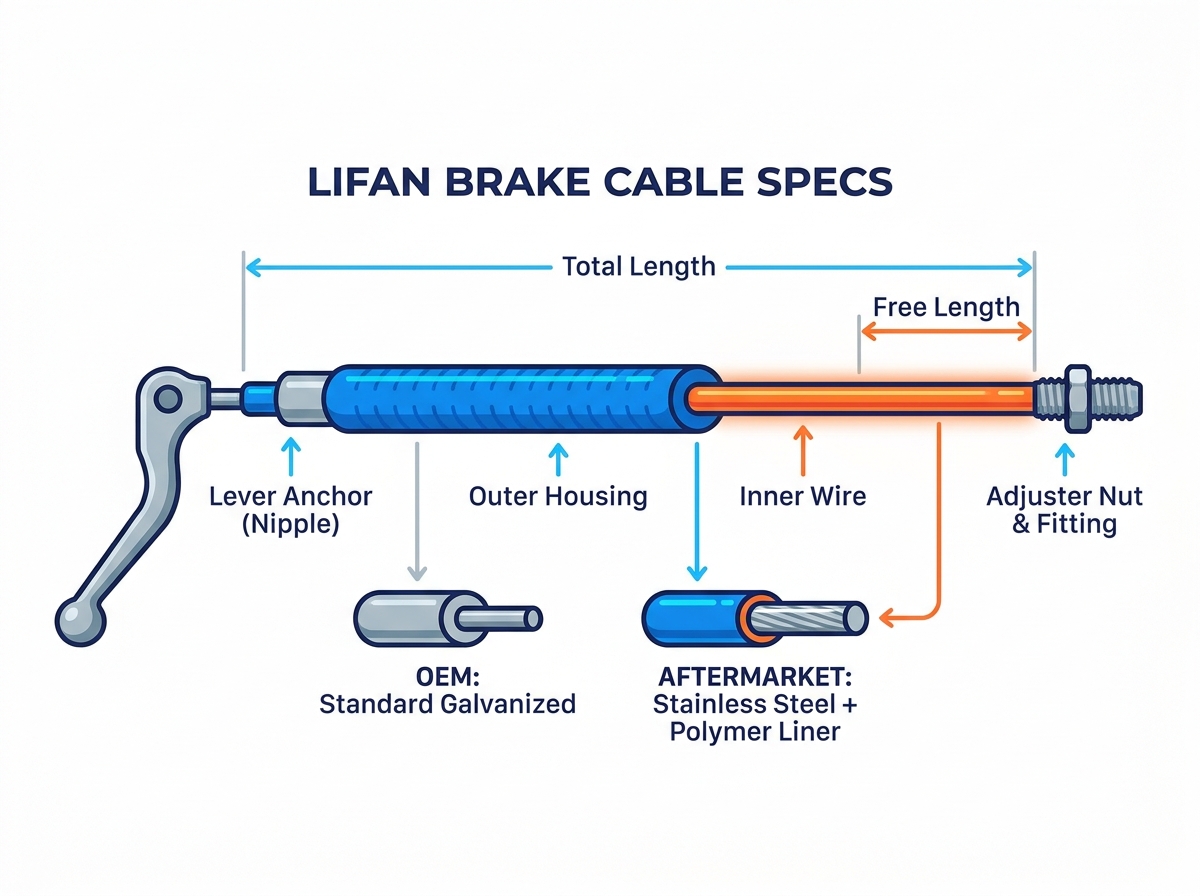
You must distinguish between the total inner wire length and the outer housing length. The outer housing protects the wire and provides a fixed structure for tensioning. The inner wire actually pulls the brake mechanism. The difference between these two measurements forms the "free length." This exposed wire, often called the "stick out," is critical. It allows you to adjust tension properly at the lever and the drum. If the free length is too short, you cannot attach the cable. If it is too long, you will run out of adjustment thread before the brake engages.
Lifan models utilize specific anchor types at the hand controls. Identifying your exact lever anchor prevents installation headaches. You will typically encounter two primary nipple shapes:
You must also examine the lower end attaching to the brake drum or mechanical caliper. Check the thread pitches on the adjuster nut. Standard pitches usually measure M6x1.0. A mismatched nut will strip the threads instantly.
Wire thickness directly correlates to tensile strength. Standard wire gauges for Lifan motorcycles range from 1.5mm to 2.0mm. The exact requirement depends on the specific model weight and brake type. Mechanical disc brakes demand thicker wires due to higher clamping force requirements. Under-sizing your wire gauge compromises safety. A thin wire may snap under emergency braking loads. Always verify the diameter using digital calipers before purchasing a replacement.
Riders often face a choice between factory-original parts and aftermarket alternatives. Each option presents distinct advantages. Understanding the engineering differences helps you make an informed decision based on your riding habits.
Standard Lifan factory replacements offer guaranteed baseline compatibility. They slot perfectly into the original routing paths. These parts are highly cost-effective for everyday commuters. However, manufacturers typically rely on standard galvanized steel for the inner wire. Galvanized steel resists rust initially but degrades over time. Moisture eventually penetrates the housing, leading to internal oxidation and stiff lever feel.
High-quality aftermarket options introduce advanced materials. They often feature Teflon (PTFE) coated inner wires. These coatings significantly reduce friction. They provide a buttery-smooth lever pull. However, they introduce specific maintenance risks. Coated wires can flake if you apply incorrect liquid lubricants. The flaked material creates internal blockages.
You must also consider the housing construction. Standard coiled housing bends easily but compresses slightly under heavy braking. This compression creates a spongy lever feel. Compressionless linear housing uses straight steel strands. It provides a highly precise braking feel. Unfortunately, linear housing is stiffer. It proves more difficult to route around tight steering head angles.
Consider your daily riding environment. Daily commuters benefit from the low cost and easy availability of OEM parts. Off-road riders or aggressive street riders should prioritize aftermarket stainless steel options. The improved braking feedback justifies the slightly higher upfront effort.
Table 1: OEM vs. Aftermarket Performance Attributes
| Attribute | OEM Baseline | Aftermarket Upgrade |
|---|---|---|
| Inner Wire Material | Galvanized Steel | Die-drawn Stainless Steel |
| Housing Type | Coiled Steel | Compressionless Linear |
| Friction Liner | Basic PVC or unlined | PTFE (Teflon) |
| Lever Feel | Standard / Slightly Spongy | Firm and Precise |
| Flexibility | High (Easy routing) | Low (Harder to route) |
Preventative maintenance saves lives. You should never wait for a complete failure before swapping out control components. Recognizing early warning signs allows you to schedule replacements conveniently.
Your hands will sense trouble before your eyes see it. Pay attention to the "spongy lever" feel. If you squeeze the brake and the resistance feels mushy, the housing is likely compressing. Another major red flag is delayed lever return. When you release your grip, the lever should snap back instantly. A sluggish return points directly to internal friction, severe corrosion, or frayed wire strands binding inside.
Perform a thorough visual check every few months. Highlight key failure points around the entire assembly. Look closely at the outer PVC jackets. Sun exposure causes the plastic to become brittle and crack. Water enters through these cracks and accelerates rusting. Examine the area directly near the lever nipple. Frequent pivoting causes the metal strands to fray here first. Finally, trace the entire line looking for kinks. A bent housing permanently damages the internal liner.
Riders often ask for an exact mileage interval. However, lifecycle expectations depend heavily on environmental exposure. A bike parked outdoors in rain, salt, or heavy dust degrades parts faster. Establish a realistic replacement interval based on conditions. For daily riders in harsh climates, expect to replace the assembly every two years. Garage-kept weekend bikes might last four to five years. Never rely on mileage alone for safety-critical components.
Buying a premium component means nothing if you install it poorly. Proper routing ensures longevity and maximizes braking force. Even minor deviations cause noticeable performance drops.
You must understand the physics of cable friction. Every bend increases the internal drag on the inner wire. Avoiding sharp radiuses is absolutely non-negotiable. Always replicate the original factory path exactly. This path was engineered to provide the smoothest curve from the handlebars to the wheel.
Keep the housing away from hot engine components. Exhaust pipes will melt the outer PVC jacket and destroy the polymer liner inside. Furthermore, address frame rub prevention immediately. Constant vibration wears away the paint and damages the housing. Use thick rubber grommets or split-loom sleeves where the line touches the steering neck or frame tubes.
Mechanics often share conflicting advice regarding lubrication. You must clarify your component type before applying any fluids. Unlined, traditional galvanized parts require regular fluid lubricants. Light machine oil or specialized spray lubes prevent rust and reduce drag. Conversely, modern PTFE-lined aftermarket upgrades require entirely different care. Liquid lubricants attract dirt and destroy the Teflon coating. Use dry graphite lubricants for lined housings, or simply leave them dry as the manufacturer intended.
New materials stretch slightly under initial load. You must perform a bedding-in procedure before riding in traffic. Follow this structured approach:
This process maintains optimal stopping power during your first few rides.
Modifying your motorcycle alters its geometry. Changes directly impact control component fitment. You must account for these alterations carefully to maintain safety.
Installing taller handlebars, such as Ape Hangers, instantly changes your reach requirements. Wider bars produce a similar effect. These modifications invalidate stock Lifan specifications immediately. If you reuse the original part, it will pull tightly across the frame. Turning the forks to full lock will actuate the brakes automatically. This creates a highly dangerous riding scenario.
Determining custom lengths requires a practical measurement approach. Do not guess the required extra length. Instead, use a piece of flexible tubing or thick string. Route the string along the exact intended path. Secure it loosely with zip ties. Once routed, turn the front forks fully to the left, then fully to the right. Observe how the string moves. Ensure it does not pull tight or bind against the headlight bucket. Mark the string at both connection points. Remove the string and measure it flat with a tape measure. This gives you the precise total length required.
Once you have your measurement, you face two choices. You can purchase custom-cut solutions from specialty manufacturers. These shops build parts to your exact specifications, including nipple types and adjusters. Alternatively, you can adapt parts from larger motorcycle models. While adapting is cheaper, it requires meticulous cross-referencing of anchor sizes and wire gauges. Custom-built options generally provide superior peace of mind.
Sourcing the correct braking components requires careful attention to detail. You must prioritize exact physical specifications over flashy brand names. A well-measured, properly routed setup guarantees responsive stopping power. Always cross-reference your specific Lifan model year and brake type before purchasing. Mechanical disc systems and drum systems utilize completely different hardware profiles. Take the time to visually inspect your current routing path today. Grab a tape measure and record your baseline measurements. Proactive maintenance ensures your motorcycle remains safe and enjoyable for years to come.
A: We strongly advise against universal kits. Universal options usually require cutting the wire and soldering on a replacement nipple. This manual process introduces dangerous failure points. A pre-measured, model-specific part guarantees factory-level tensile strength and eliminates the risk of the nipple slipping under heavy load.
A: Sticking usually results from common installation errors. You likely introduced a sharp bend or pinched the housing behind the headlight bucket. Another frequent cause is applying incompatible liquid lubricants to a Teflon-lined inner wire. This causes the internal coating to swell and grip the wire.
A: You should aim for a standard technical benchmark of 10-20mm of free play measured at the lever tip. This slight slack prevents the pads or shoes from dragging continuously while riding. Use the threaded barrel adjuster at the lever perch to dial in this measurement safely.
A: Absolutely not. A frayed inner wire is structurally compromised. Once a single steel strand breaks, the remaining strands undergo excessive stress. Repair attempts like soldering or wrapping tape cannot restore tensile strength. You must replace a frayed part immediately to avoid sudden failure.


